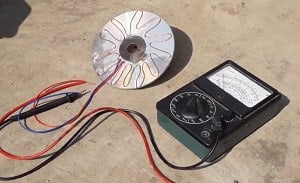
Do you find it strange to construct solar panels out of CDs? Well, many of us probably wonder if it is really possible to make one. Interestingly, creating a solar panel built with a CD can be a fun-filled experiment or activity. But the question is how to make a solar panel with CD?
By reading this whole post, you will uncover the step-by-step guide of creating solar panels using CDs. Aside from delighting in a DIY project, hopefully, you will unveil more about the wonders of solar power and how beneficial it is in our daily lives. So, let’s get started!
Table of Contents
Materials Required for Building a Solar Panel Using CDs
- A CD plate
- Multimeter
- Wire cutters
- Copper wire
- Superglue
- Insulated electrical wire
- Zener diodes
- Small low-voltage device
- Soldering iron
If you don’t know how to test solar panels with a multimeter, just check my guide here!
If you don’t have any spare CDs at home, you might want to ask your friends or neighbors. Or, you can find them in online stores or go to used record stores to purchase some bargain CDs.
The Step-by-Step Process on How to Make a Solar Panel with CD
Step 1: Glue the Copper Wire.
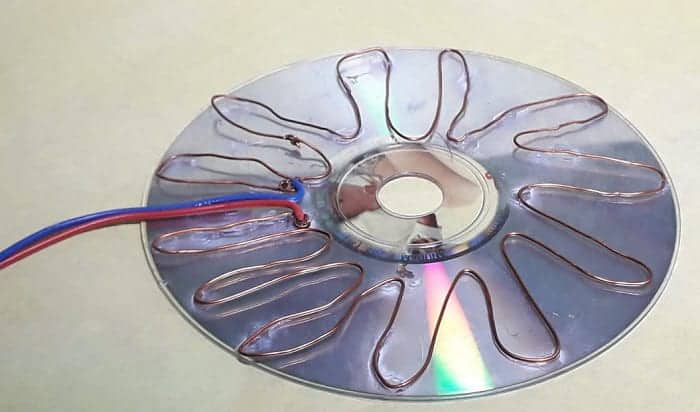
Attach the copper wire to the glossy rear side of the disk. You can do this in many different methods; however, the most common approach is twisting the copper wire into isolated curved sections.
Begin by gluing the end portion of the copper wire near the middle hole of your CD. Then, spread the copper wire up to the edge of the CD, create a hairpin bend, and return it to the middle hole.
Redo the same step as you go in a loop around the compact disc; attach the wire as necessary. After every three or four bends, trim the wire near the middle hole and begin another section. The wire must look like petals surrounding a flower in the end.
You can try other kinds of wire placement when making a solar panel using CDs. This way, you can see what suits you best. As mentioned earlier, there are many alternative designs available.
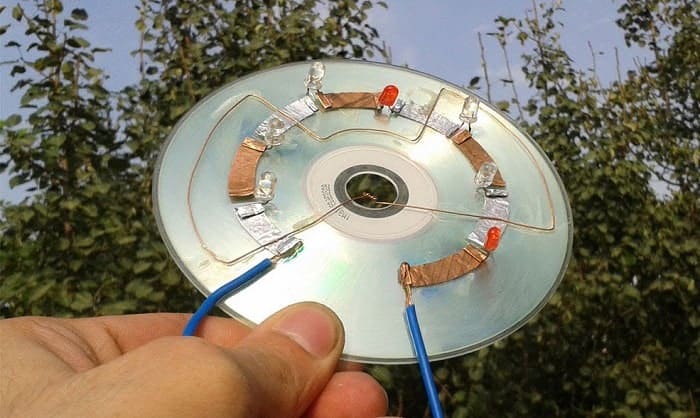
Step 2: Affix the Zener Diodes to the Gaps of the Copper Wire.
Once the copper wire has been fastened and completely dried, the next step would be to glue the Zener diodes. These are utilized to help in regulating the voltage.
Zener diodes must be positioned in the breaches between the cut sections of the copper wire. Solder the edges of the copper wire to the edges of the Zener diodes. Do this using a soldering iron.
It is necessary to ensure that one of the breaches is open because you will need to link the insulated wires here later.
Step 3: Attach the Insulated Electrical Wire.
After you have soldered the Zener diodes, you’ll need to link the insulated electrical wire to your compact disc solar panel. Use a small blade or knife to tidy the very edges of the wires to create a more secure connection.
In this step, you’ll need to utilize the soldering iron again to weld a couple of the copper wire edges to the insulated electrical wire edges. After this, your simple DIY project on how to make a solar cell from CD is done. The next important step is to examine if it is working.
Step 4: Attach the insulated wires to a multimeter to test if it’s working.
On a cloudless day, go outside to test if the DIY compact disc solar panel is functioning. Attach your solar panel to the multimeter utilizing the electrical wires and position the CD in direct sun exposure.
If your CD solar panel is working accordingly, the meter’s reading will rise with direct sun exposure. Alternatively, place the solar panel in a shady spot, or cover it with an object or your hand to check how the reading response.
If your newly-built solar panel appears to be producing power, consider wiring it to a small low-volt device to examine if you have constructed a source of solar power.
What are the Possible Uses of a Solar Panel Made Using CDs
Science Project for Students
Constructing a DIY solar panel can be a simple means of demonstrating electricity production to students. It becomes easier for teachers to teach their students how solar energy works.
Please note that teachers need to supervise their students because even though this is a DIY project, it requires using a soldering iron. Nonetheless, all the other required items for this project are safe to use, easy to find (some are already available at home), and affordable.
Learning
Discovering the simple methods of constructing a solar panel out of CDs is unquestionably an exciting form of educational experience. Students are encouraged to learn more since they are keen on hands-on learning. This DIY project and experiment allow students to witness the outcomes of their work.
In the same way, creating a solar panel is an ideal learning experience for old and young people. Adults and young kids can all benefit from this experiment. It can also serve as a passageway to seeking more solar projects and broadening their knowledge of renewable energy.
Low-cost Energy Source
Instead of allowing old CDs to collect dust and rot in our cabinets, we can use them for practical projects or experiments. Captivating solar power through copper wires and CDs is a low-cost means of producing natural energy.
The delightful news is that the moment your solar panel is built, all of the energy produced would come from sunlight. But, be reminded that this won’t supply sufficient power to run your devices.
Toy
You heard that right! Your homemade solar panel can serve as a toy. It is up to you to decide where you’ll use your solar panel.
While there’s no doubt that it can only supply limited power, many people decide to power mini lights or small handheld fans.
What matters the most is that you are confident with the process of making your DIY solar panel. This way, you can be more creative and quickly uncover more fun uses for your solar panel.
Experiments
While it’s true that you can’t use solar panels made using CDs for powering all the electronic appliances at home, they can provide us with some exploratory opportunities.
Now that you have unveiled the perks of making your own solar panel using CDs, don’t you think it’s high time to give it a try? You can consider adjusting some tiny details as required to make your DIY solar panel successful.
Undoubtedly, solar energy is an excellent and environmentally-friendly method of harnessing free renewable energy. And, the step-by-step guide above demonstrates just how smooth sailing it can be.
What Can You Run with a DIY Solar Panel Built Using CD
Now, the question is; can you run the electronic appliances at your home using a CD solar panel? Unfortunately, the answer to this question is no. You may add more CDs; however, it won’t make sufficient wattage to run your appliances. As mentioned earlier, the only things you can run with a CD solar panel include mini fixtures and toys.
To get more ideas on how to get started with your DIY solar panel, you might want to take a look at this video:
Key Takeaway
Did you find our post on how to make a solar panel with CD valuable? In this digital era, CDs seem to be not-so-popular items anymore. Nowadays, it’s easier and more convenient to connect to computers and other small gadgets for music updates.
But, this does not mean that we should just throw our old CDs away. We can recycle or repurpose them into more valuable items. Their reflective or glossy surfaces are ideal for constructing a DIY solar heating panel. So, generating free solar power is possible.
Please feel free to share this post if you find it helpful for your DIY project.

I am Kathleen Miller, staff writer and reviewer of the Avasolar team. Working with the team has been a pleasure for me so far, I hope to bring readers useful information by creating detailed and easy-to-follow contents.

