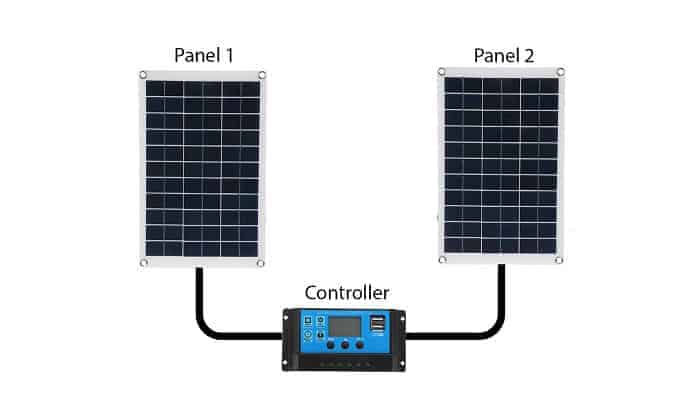
Are you planning to purchase or have you already purchased portable solar kits but are slightly baffled on how to connect two solar panels to one battery charge controller? If so, the good news is that there is nothing for you to worry about. The process is not as complicated as you imagine.
In this post, we’ll help you with your concerns about how to connect two solar panels to one controller. Likewise, we’ll discuss the materials you’ll need to prepare as well as the step-by-step guide on how to carry out the task correctly. Let’s keep the ball rolling!
Table of Contents
The Tools and Materials Required
Here are the tools and materials you’ll need to prepare:
- Screwdriver
- 2 Solar panels
- MC4 inline fuse
- A charge controller
- Battery
- All necessary wires & adaptor kit
Now that you have already prepared the necessary tools and materials for connecting your 2 solar panels to a charge controller, let’s now head to the step-by-step guides of the process.
The Method of Connecting the Solar Panels to your Solar Charge Controller
Step 1: Hook up the battery to your solar charge regulator.
Please note that this guide should not replace the instructions in your battery or charge regulator’s manual. We strongly suggest following the instructions on your manual if you find them different from ours.
It is vital to hook up the battery to the charge regulator first. From there, you can link the solar panels. Keep in mind that if you execute the tasks in the wrong order, it might cause damage to the charge regulator.
Link the negative battery cable to the “-” battery terminal of your charge regulator. After that, you may link the positive cable to the “+” battery terminal of your charge regulator.
From there, you can safely hook up the battery cables to the battery terminals. Link the negative first, followed by the positive. By this time, your regulator should light up or switch on.
For example, the one used in this guide has a BATT light that switches on when the battery is correctly hooked up.
Step 2: Link the solar panels.
In this step, you’ll need to connect the two solar panels together. You can do this in parallel or series. Note that linking two solar panels in series would increase the voltage, while parallel will increase the current. If wiring in series, you’ll need a smaller-sized wire than if you wire in parallel.
As for the fuse, this is defined in the datasheet of the solar panel or the sticker label located at the rear section of the panel. You can utilize an inline MC4 fuse.
Step 3: Affix the two solar panels to your solar charge regulator.
Your battery is now hooked up, and your solar panel wires are all set to work. The next step is to hook up the solar panels to your charge regulator.
First, combine the negative solar cable to the “-” solar terminal on the charge regulator. Then, hook up the positive solar cable to the “+” solar terminal.
The wire from your solar panel would be pretty short to run to the charge regulator. So, consider extending it to reach the charge regulator. Oftentimes, you’ll need to use a series connection, so our steps will follow wiring in series.
When wiring in series, you have to place the charge regulator as close to the batteries as feasible. If possible, position the charge regulator close to the two solar panels to reduce wire losses. If there’s remaining wire from your panels to the charge regulator, consider shortening them to minimize wire losses.
Step 4: Affix the loads.

You could link the little DC loads to the charge regulator’s load terminal. If you plan to use an inverter, it is best to utilize the battery terminals. Bear in mind that the size of your wires will mainly rely on the current that would run through the wires.
Indeed, if the inverter utilizes 100 amps of current, then it’s essential to size the cable for that current. When you’re done, you could utilize the solar panels to operate a fridge or heat your greenhouse.
Heads up: Just like with the battery, the charge regulator should also light up to disclose that your solar panels are successfully linked. At this time, refer to your solar charge regulator’s manual to check if it’s necessary to adjust its settings.
For this, you might need to indicate the type of battery you use, voltage, and other related details. If the default setting of your charge regulator matches the specs of the system, it wouldn’t be necessary to modify anything.
On the other hand, if you’re wondering how to quickly hook up multiple independent solar panels using the same charger controller, you can refer to this video:
Why is It Essential to Connect the Solar Panels to a Charge Controller
It’s critical to connect the solar panels to a charge controller because it regulates the power to the battery bank from the solar array. In the same way, it plays a vital role in ensuring that the deep cycle batteries aren’t overcharged during the daytime.
The charge controller also ensures that the power does not run back to the solar panels and deplete the batteries throughout the night. Some solar charge regulator models are available with more advanced capabilities, such as load control and lighting. Nonetheless, their main job is managing power.
In addition, a solar charge regulator comes in two forms: MPPT and PWM. The main difference between the two is the way they execute their functions. In general, MPPT charge regulators are pricier compared to PWM charge regulators.
FAQs on Wiring Solar Panel to a Solar Charge Regulator
Why is a charger regulator not switching on or lighting up when I hook up a solar panel?
In this case, your solar panel probably calls for some amount of sun exposure. To solve this, consider placing the panel outside under direct sun exposure. Please note that a solar charge regulator should turn on or light up to indicate that it’s correctly hooked up and the battery is charging well.
Meanwhile, if this method does not work, refer to your charge regulator’s user guide for some troubleshooting solutions.
Are solar adapter cables necessary?
The cables in your solar panels probably come with pre-affixed MC4 connectors, which are ideal for hooking up two solar wires together. Nevertheless, you cannot attach them to a charge regulator, which is why you need to use solar adapter cables.
Fundamentally, solar adapter cables come with an MC4 connector on one edge and are stripped at the other end. Due to this, it’s easier to link the MC4 connector to the solar panel cable and hook up the stripped edge to the charge regulator.
During installation and maintenance, there are some necessary equipment that you should refer to, such as 12 volt solar battery chargers, deep cycle battery chargers and solar battery maintainers.
What to do if a solar panel does not come with MC4 connectors?
Purchase a few solar adapter cables with connectors that suit the ones found on your solar panel wires.
Alternatively, consider creating your own by cutting two lengths of solar wires, stripping both edges, and crimping.
Conclusion
To wrap up, learning the steps on how to connect two solar panels to one controller isn’t a tough job to carry out. To do so, you only need to prepare the tools and materials and carefully follow the step-by-step guides on hooking up the panels to your charge regulator.
Remember that it’s essential to follow the instructions; avoid doing your own version, or thinking of short-cut methods. It is also crucial to refer to your system’s manual if you find the guide here different–this is for safety purposes.
Did you find this post informative? Please feel free to share it with other readers!

I am Kathleen Miller, staff writer and reviewer of the Avasolar team. Working with the team has been a pleasure for me so far, I hope to bring readers useful information by creating detailed and easy-to-follow contents.